Book a consultaion
Fill out the form and our administrator will contact you to schedule a visit.
Thank you! Your request has been received. We will contact you shortly.
Oops! Something went wrong. Please try again.
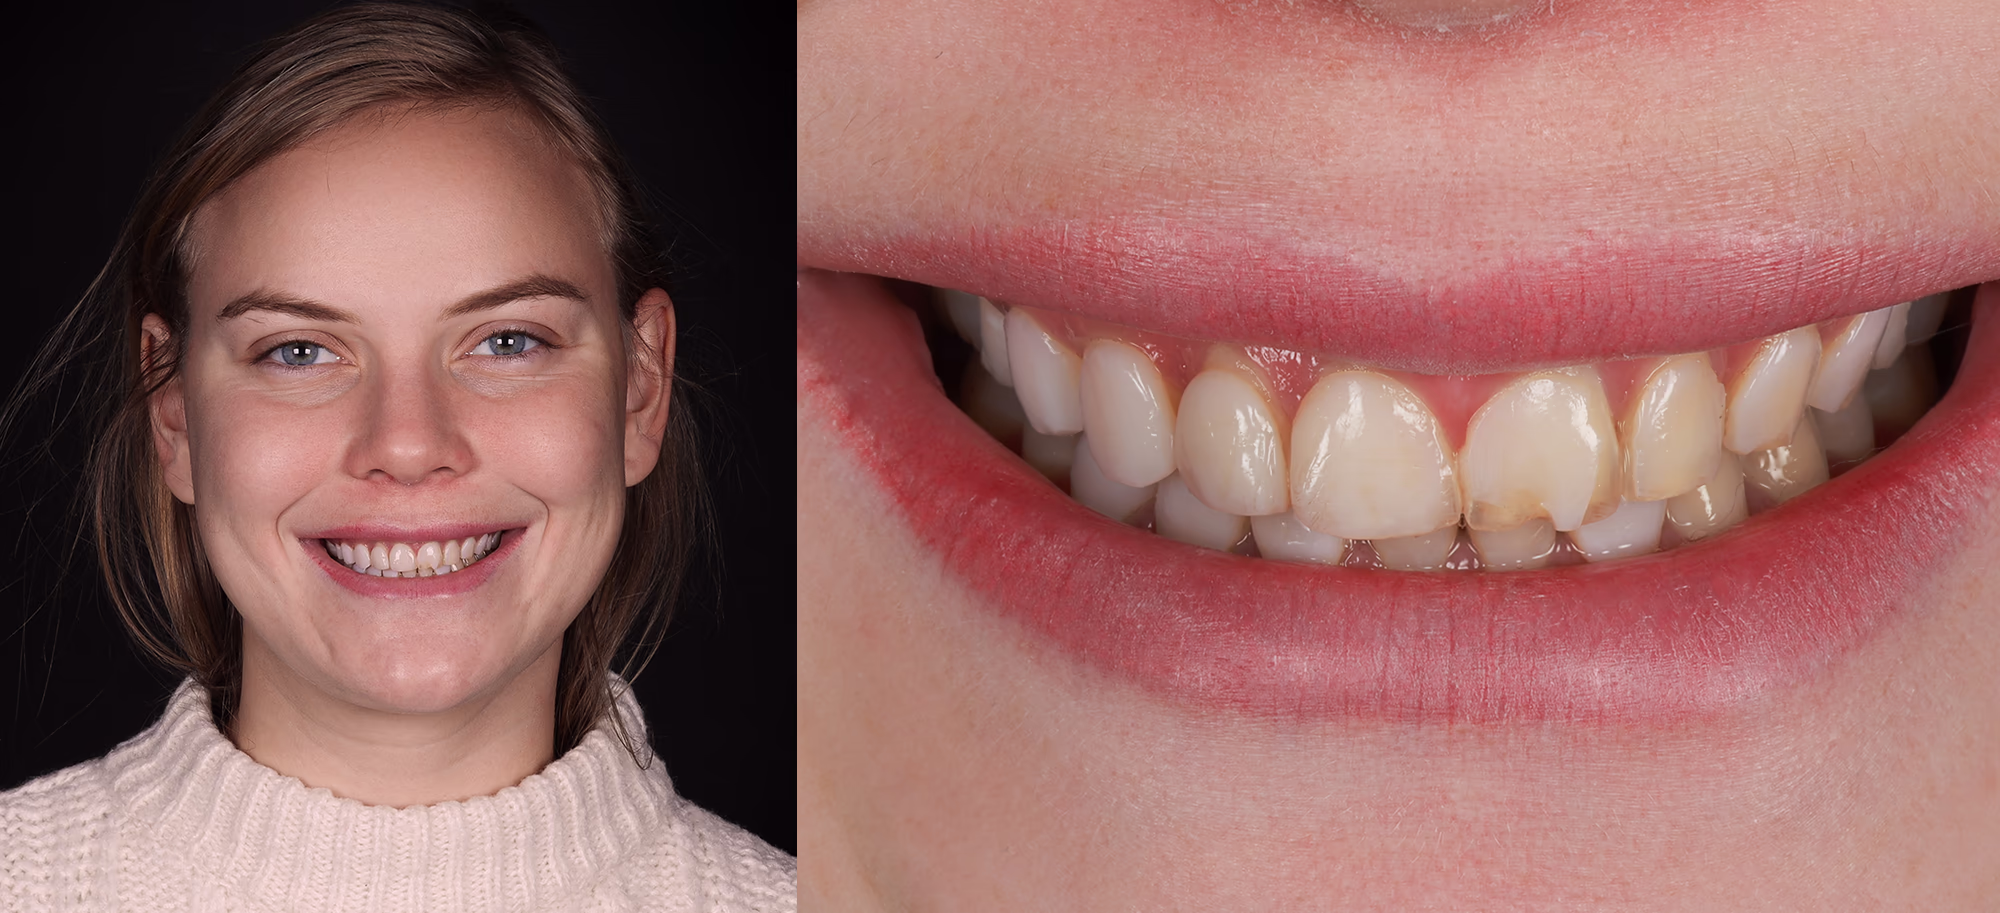
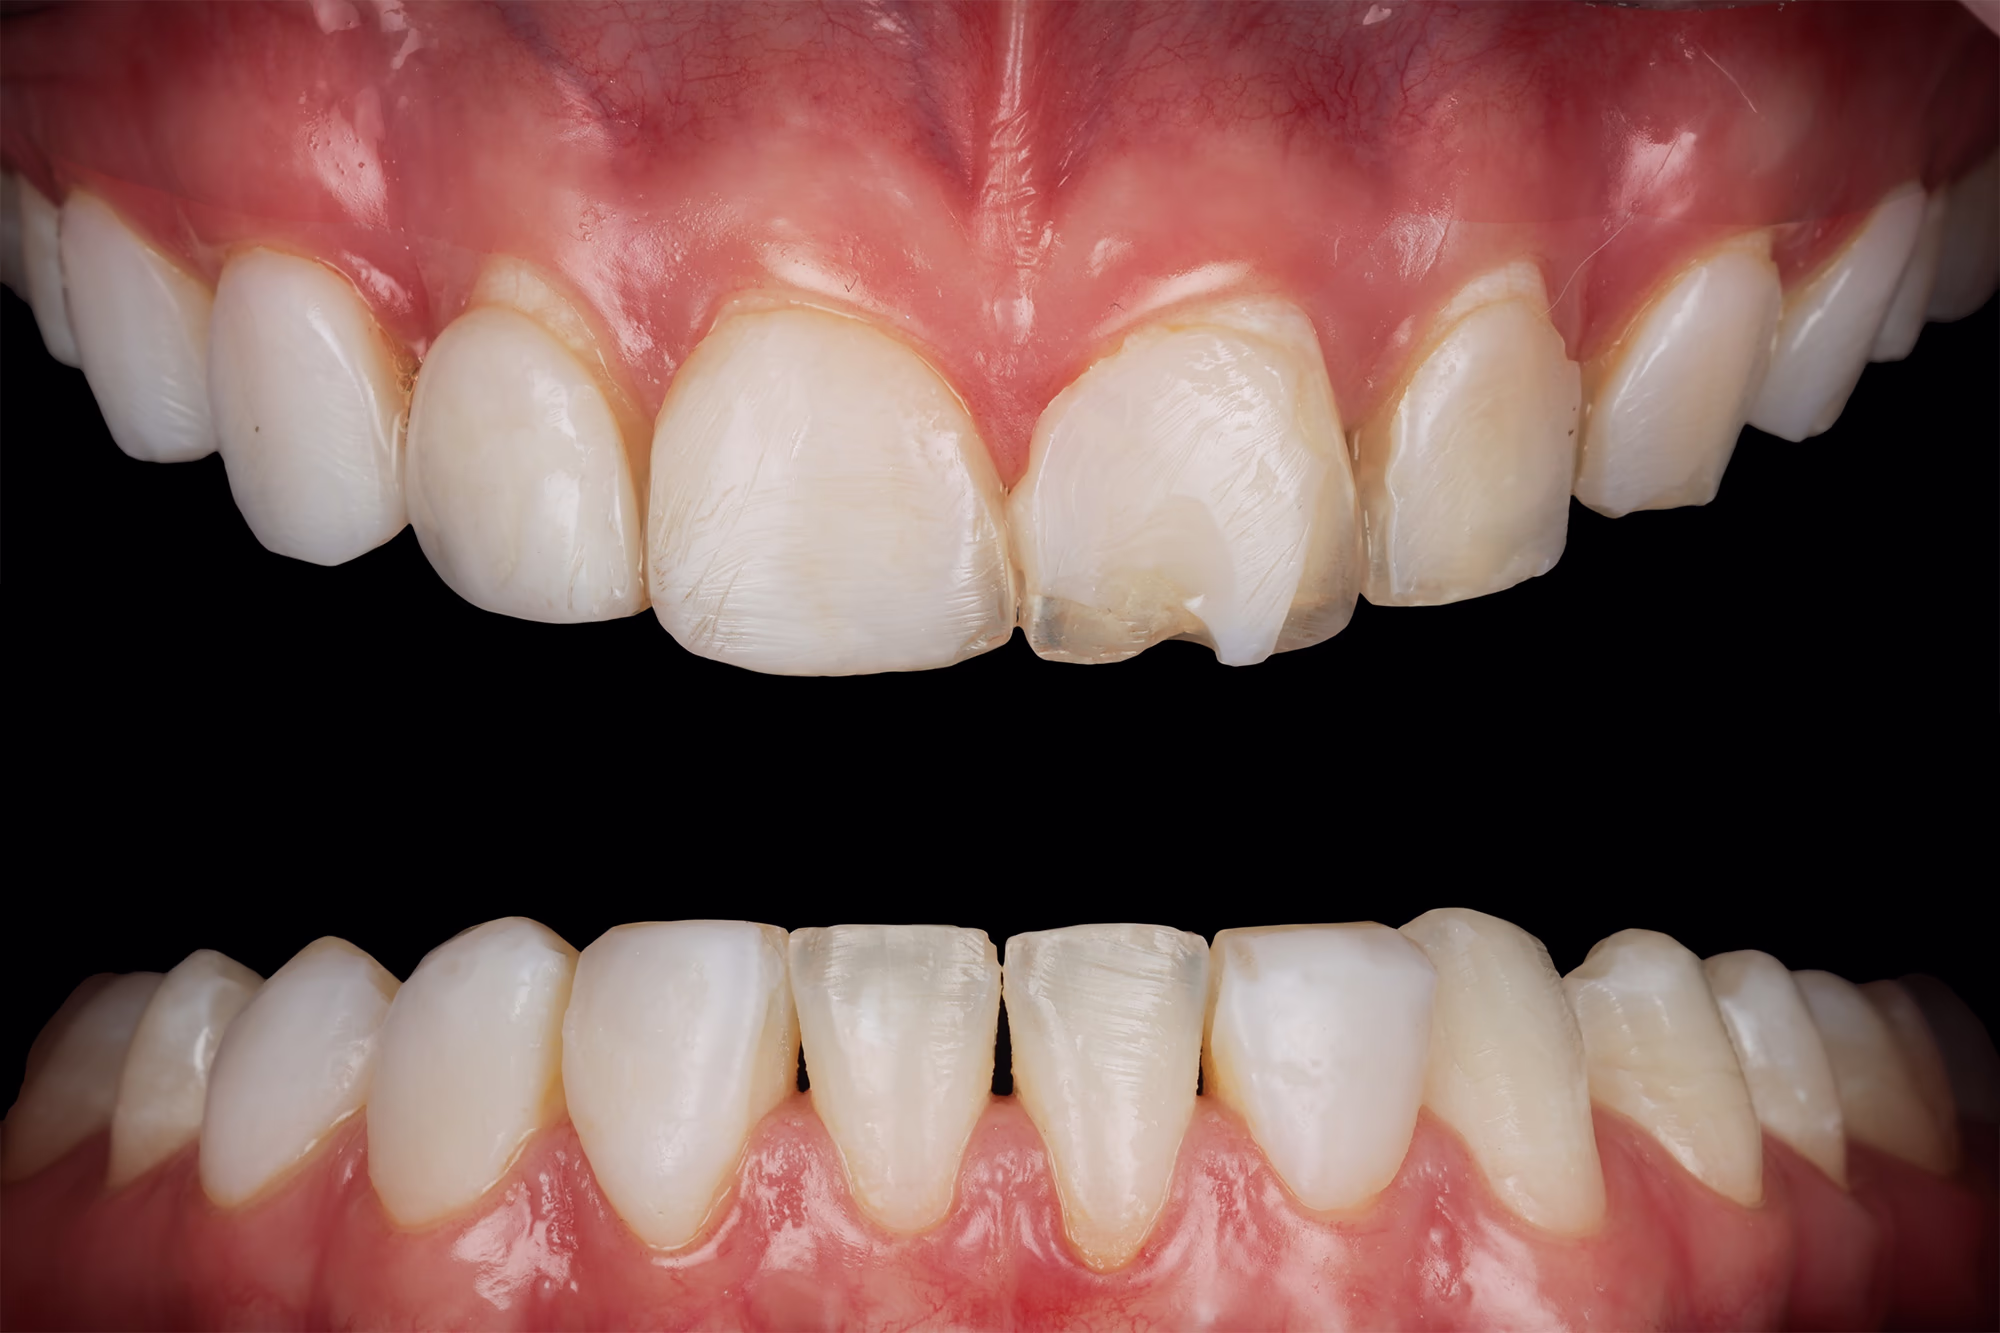
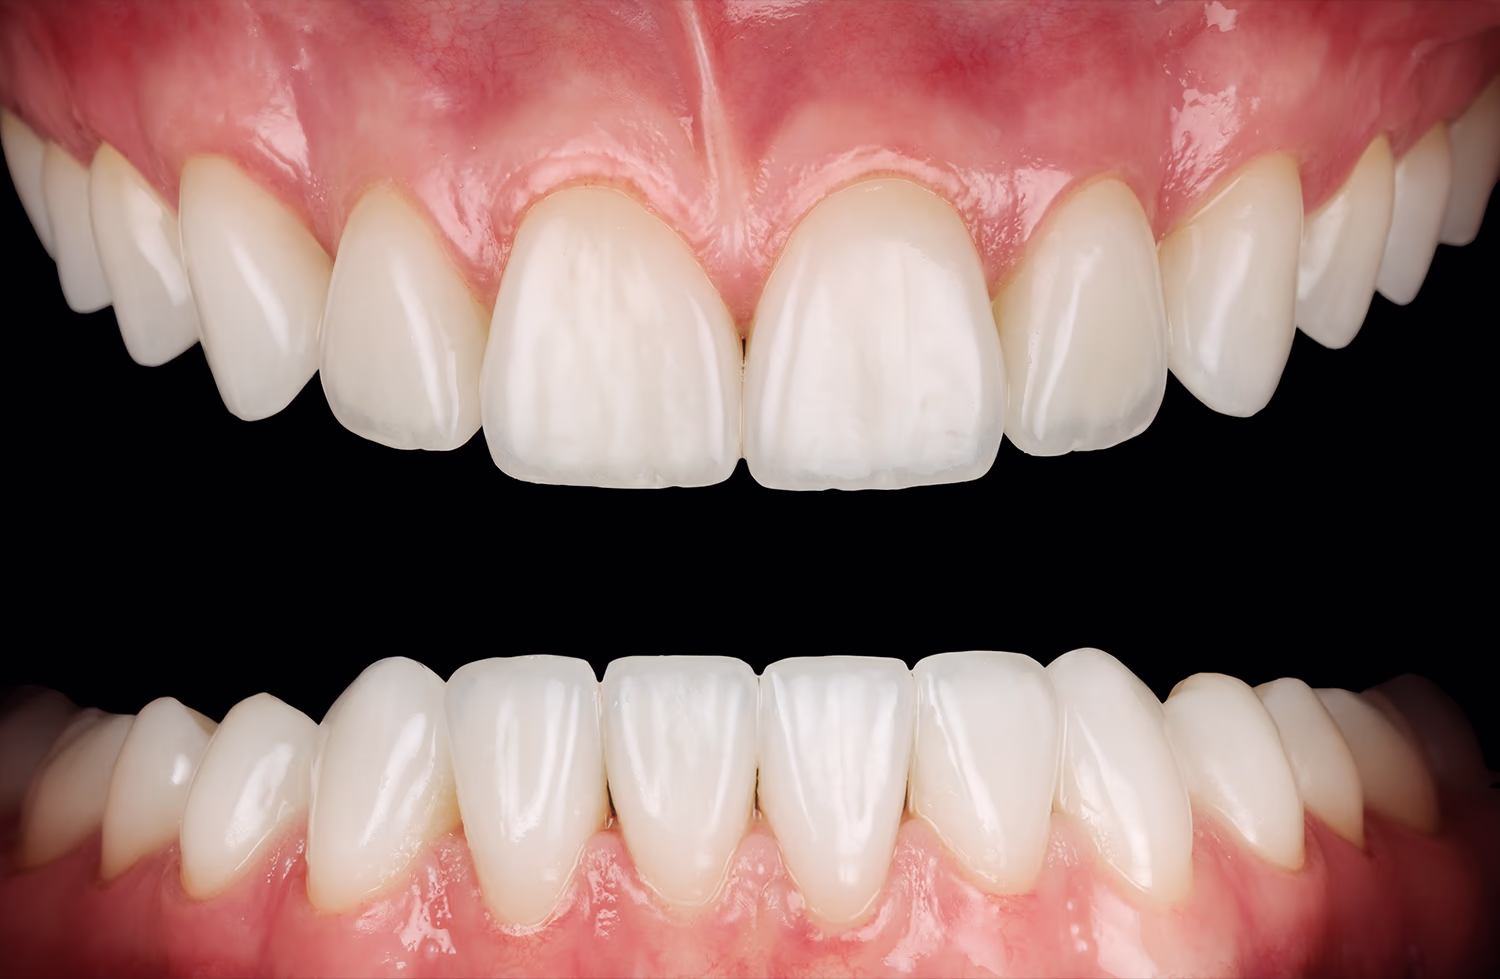
A 25-year-old female patient Dasha presented to Sergatiy Dental Clinic, Kyiv, with a request to improve the appearance of her maxillary and mandibular teeth.
Objective findings.
Multiple composite restorations were seen in the maxillary and mandibular arches. Several maxillary restorations exhibited chipping. Some mandibular teeth had no composite material, but showed traces of prior tooth preparation. The remaining restorations were of inadequate quality, with areas of debonding, compromised seal, and deficient marginal adaptation.
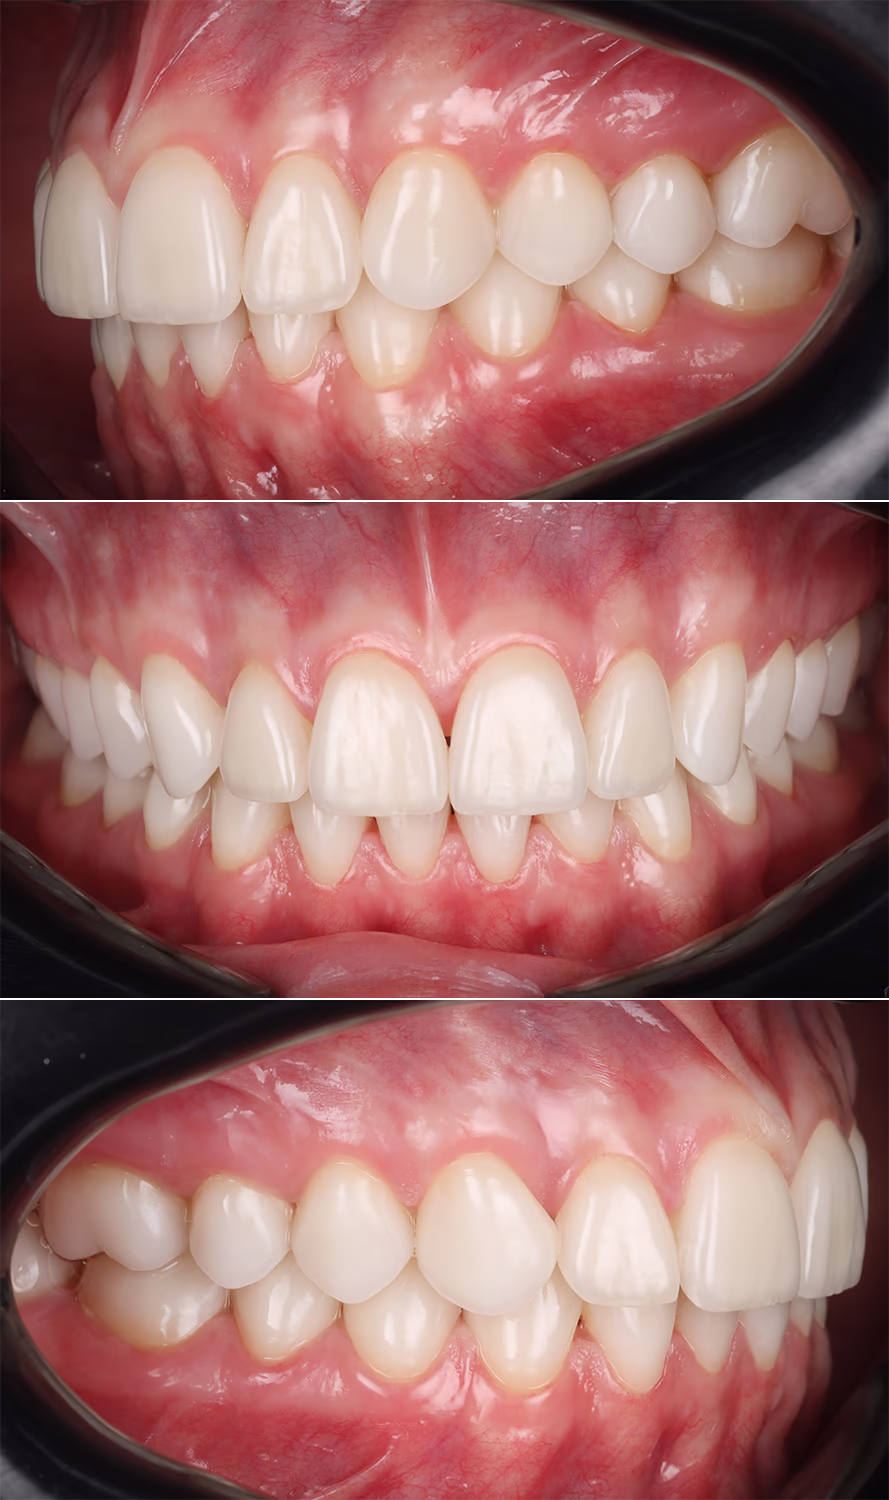
Some anterior guidance issues were noticed at protrusive movements.
Lateral guidance:
– During the right laterotrusion, contacts were present on the anterior teeth.
– During the left laterotrusion, a group function pattern was observed, with contacts on the anterior teeth.
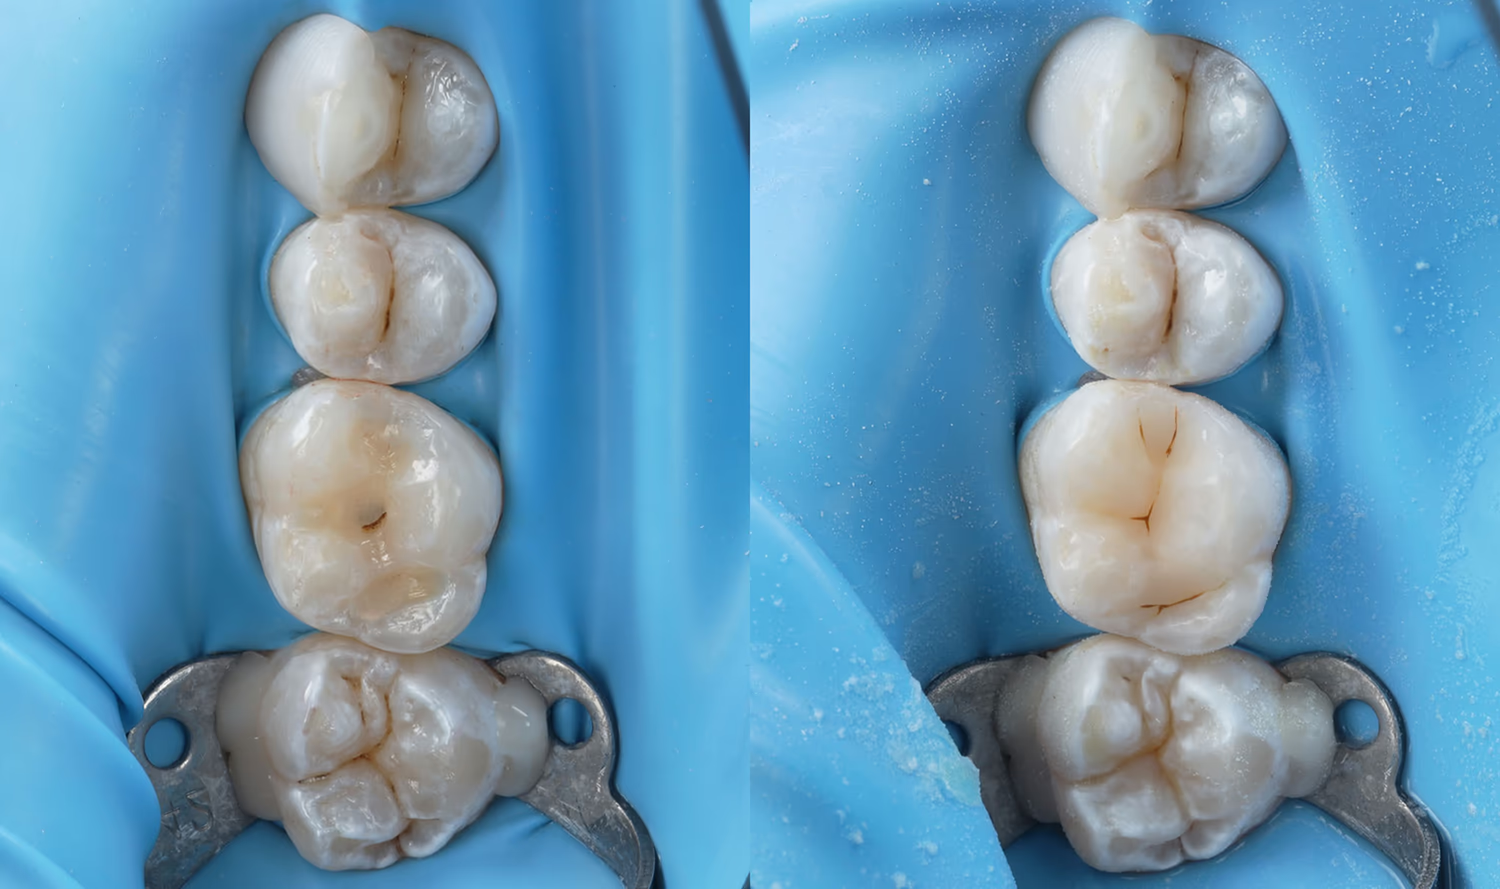
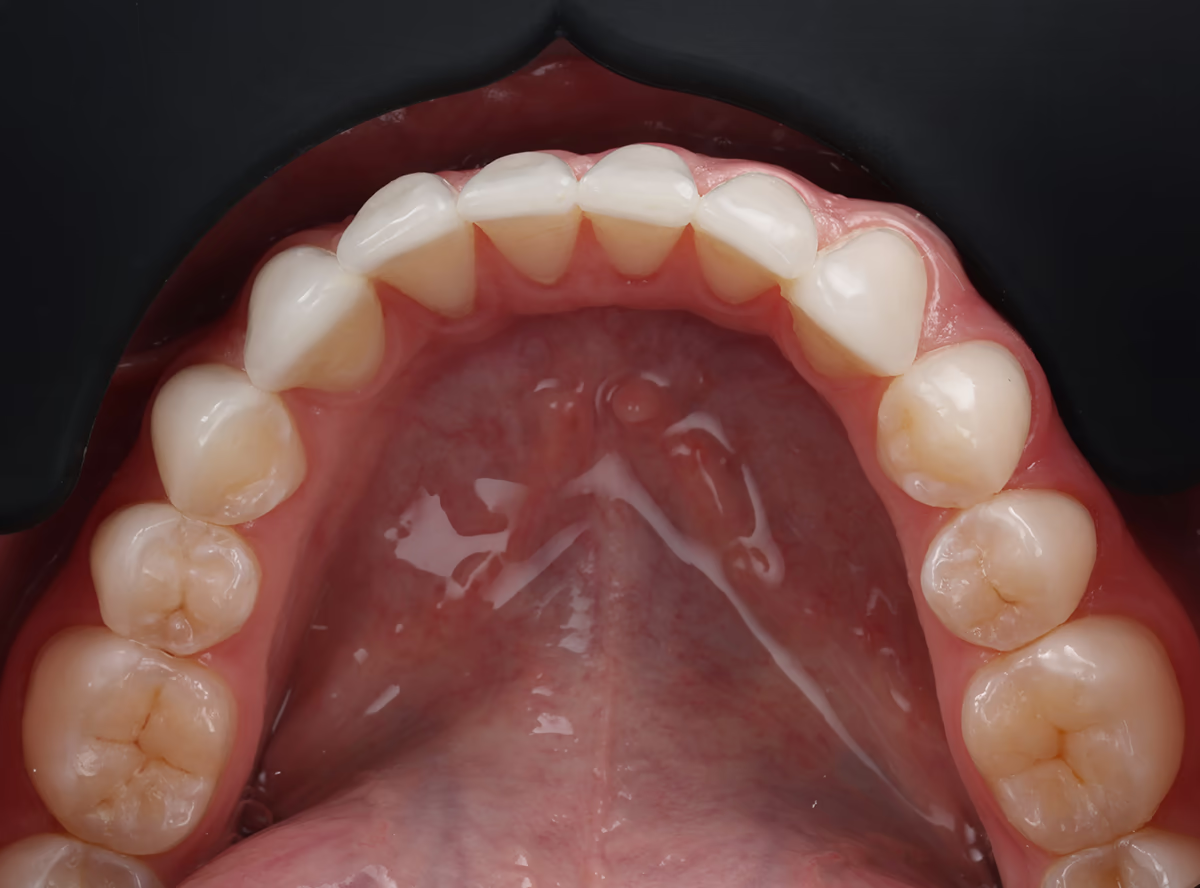
Old Class I composite restorations were found on the occlusal surfaces of the maxillary and mandibular molars.
Treatment options to restore the integrity of tooth structure and normalize occlusion and esthetics included:
– Composite restorations using a template/index (direct restorations)
– Ceramic veneers (indirect restorations)
In patient rehabilitation where timelines are tight and esthetic expectations are high, it is crucial to gauge the invasiveness of the intervention and anticipate long-term outcomes. Considering the patient’s young age, it is sometimes advisable to combinedirect composite restorations with indirect ones—ceramic veneers—on the same tooth to maximize the preservation of the sound tooth structure.
While combining several materials is not a common approach, in our view it offers significant advantages.
A functional diagnosis was performed.
Superimposition of cranial CT data (in habitual occlusion), intraoral scans, and individualized mandibular movements recorded with a digital axiograph yielded the following insights:
– The position of the condylar heads within the fossae was optimal.
– Mandibular movements were reproducible.
– The interocclusal space was adequate for further work.
– The mandibular position could be maintained as is.
The patient reported no limitations in mouth opening or joint noises such as crepitation or clicking.
Palpation of the masticatory muscles revealed no spasm, hypertonus, or tenderness.
The loading test was negative.
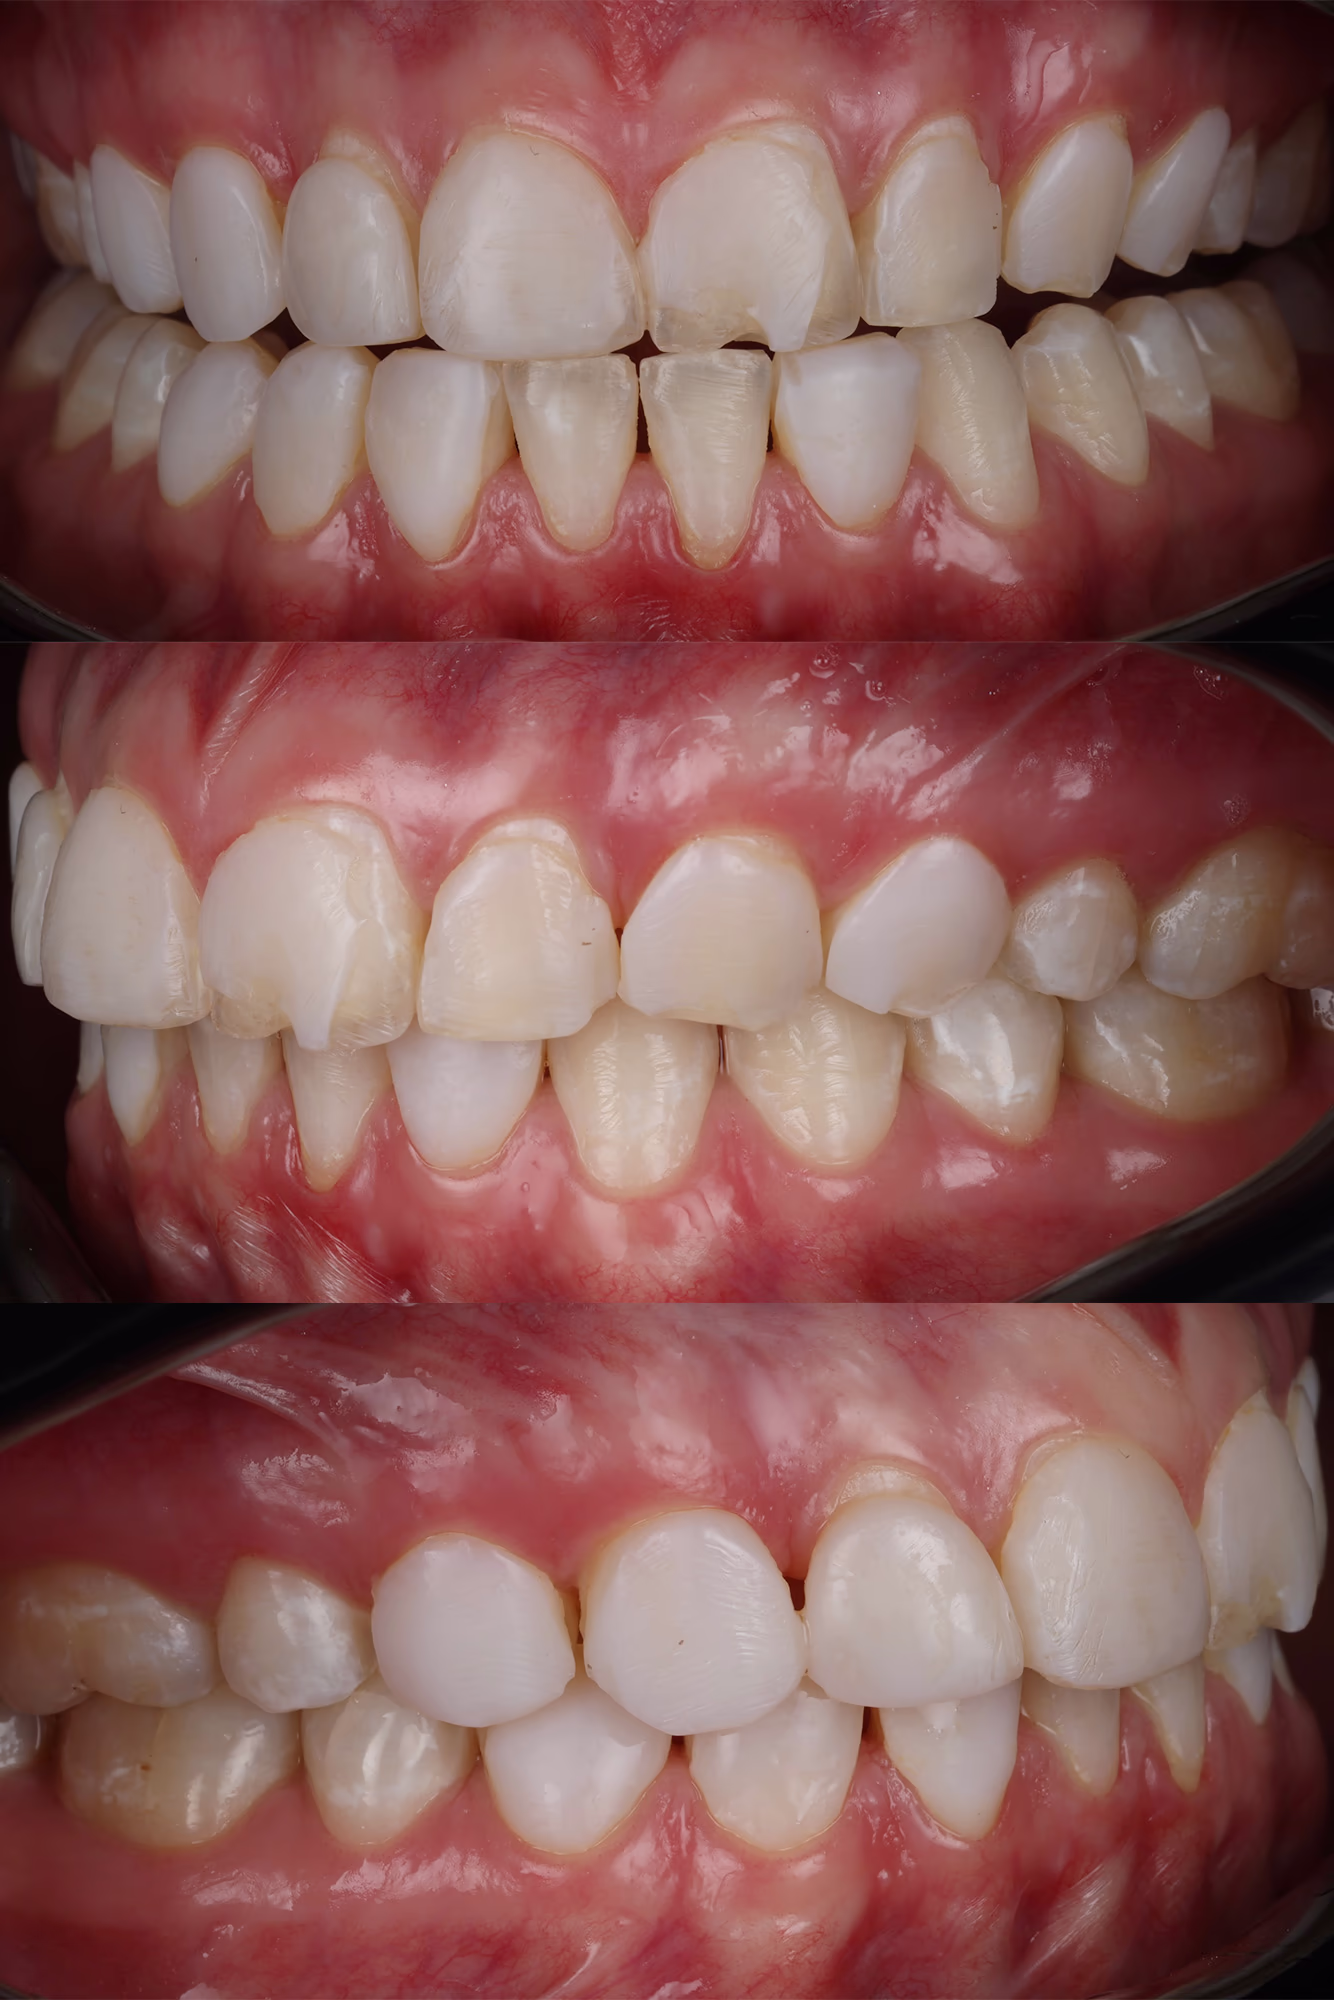
The patient’s face and smile photo and video analysis revealed the following:
– Smile line: average.
– Tooth display at rest: 3.5 mm.
– Smile width: 12–14 teeth visible.
– Buccal corridor: within normal limits.
In this clinical case, we decided to replace the aged molar composite restorations on the occlusal surfaces and to create the vestibular esthetics on these teeth with indirect ceramic veneers—i.e., to combine direct and indirect restorative techniques.
As an alternative clinical solution, the occlusal surfaces of the molars could have been completely covered with ceramic vonlays (veneer-onlay). However, this would have required reducing the cusps and the entire occlusal surface by 0.8–1.2 mm.
Given the patient’s young age and the relatively small volume of the existing composite restorations, the chosen approach was deemed less invasive.
The next step was to replace the old composite restorations on the molars.
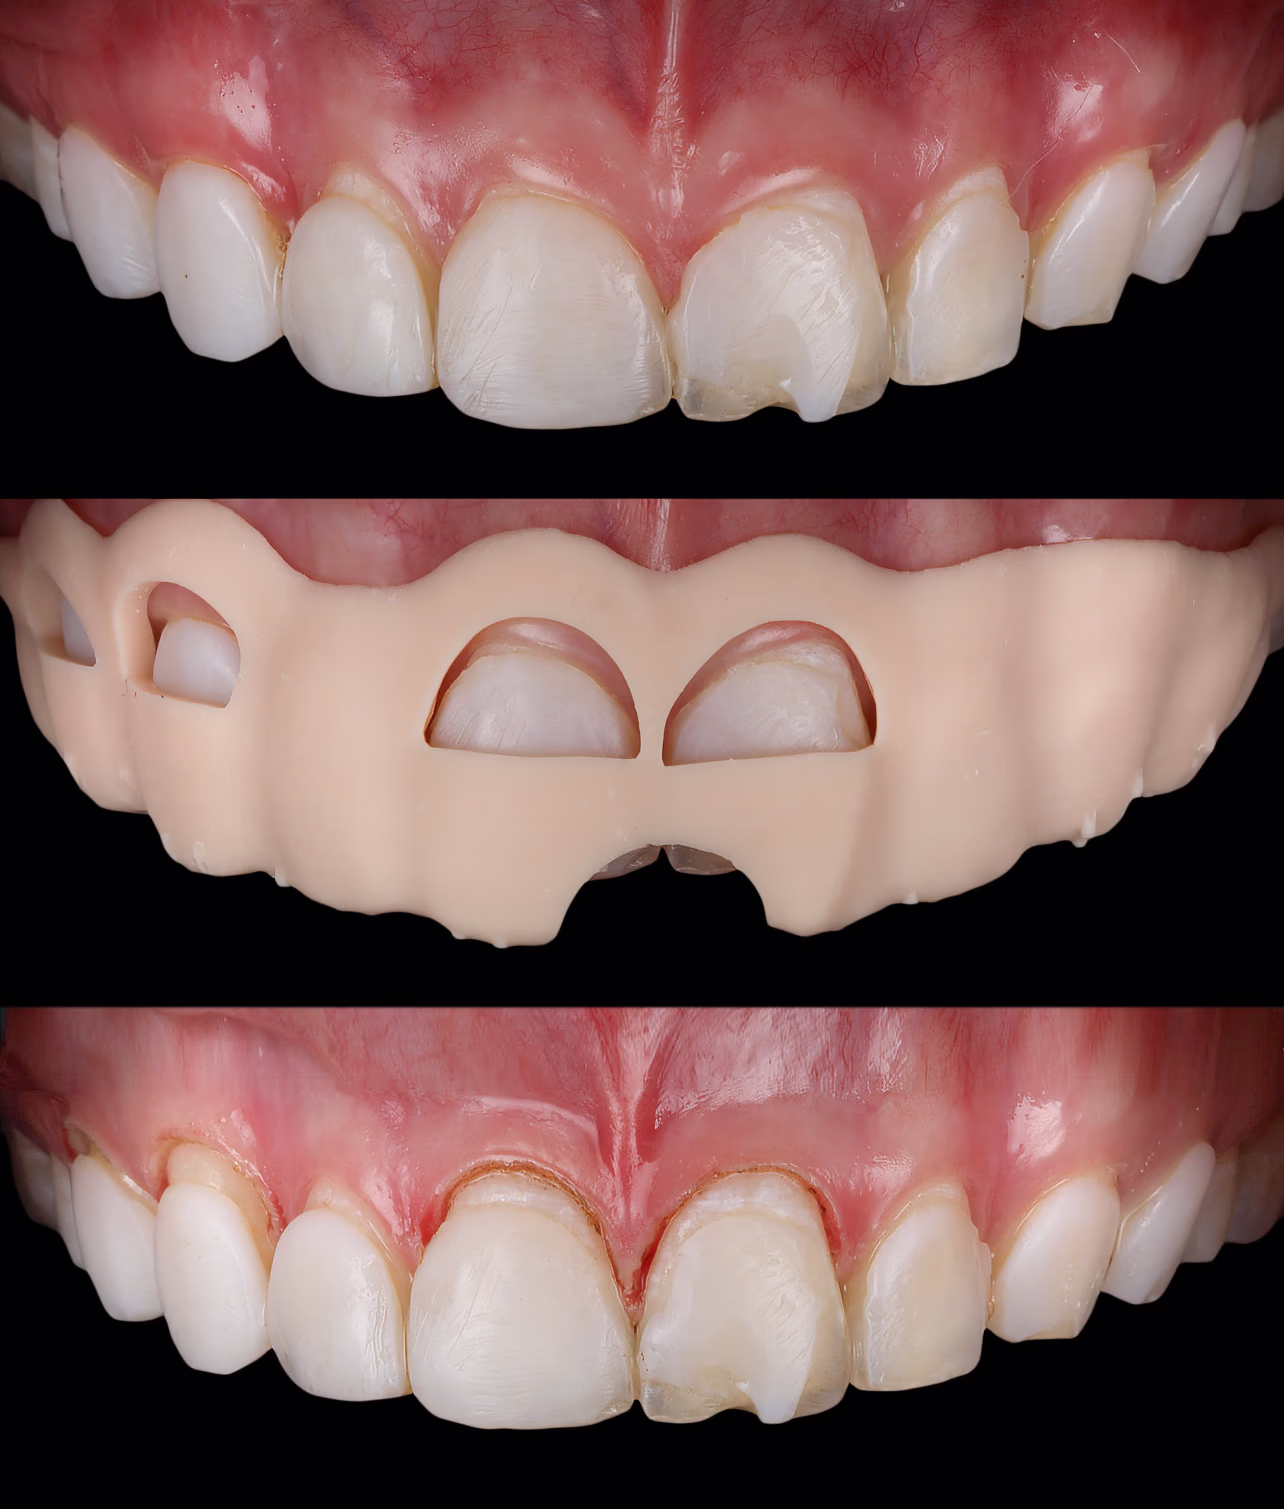
The wax-up identified the need to correct the gingival zeniths in the region of teeth 11, 13, 14, 21.
A soft-tissue correction guide was fabricated in the dental laboratory. In this guide, the gingival zeniths replicated the new design of the future teeth.
Soft-tissue correction was performed using an electrosurgical unit.
Accurate intraoral transfer of the wax-up was not initially feasible due to the excessive vestibular bulk of the old composite.
In this situation, two approaches were possible:
1. Fabricating two wax-ups. The first one would accommodate the overcontoured vestibular composite; the second would reflect the correct (final) vestibular volume. Transferring the first one, pre-adjusting all overcontoured areas, then transferring the second one allowed us to demonstrate the mock-up (the future smile).
2. Fabricating a wax-up with the correct (final) vestibular volume. Ignoring the excess bulk of the old composite initially. Demonstrating the mock-up (future smile) only after complete removal of the old composite.
We chose the second option after discussing it with the patient and obtaining her approval.
Tooth preparation under an operating microscope enabled maximal tissue preservation and precise differentiation between the old composite and sound dental tissues.
Under infiltrative anesthesia, preparation consisted in removing the old composite, polishing, and creating a well-defined finishing line (margin).
Preparation was performed with Komet diamond burs (868314012, 8868314012, 868314016, 8868314016).
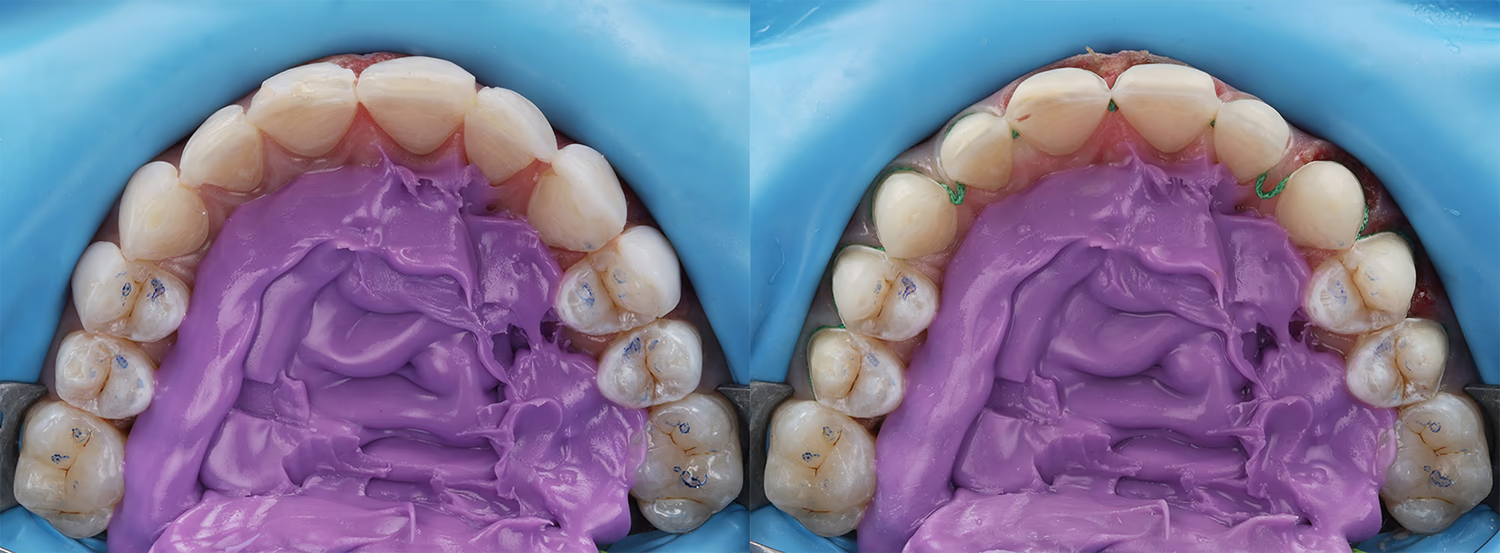
For greater comfort during the maxillary teeth preparation, the field was isolated using the split-dam technique.
The patient selected shade BL3 for the final restorations; therefore, a 000 retraction cord (Sure-Cord) was placed in the sulcus during preparation to achieve vertical retraction and apical displacement of the soft tissues.
The teeth were prepared within enamel as window veneers with reduced incisal edge.
Prior to digital impressions (scanning), a second cord impregnated with hemostatic agent (Sure-Cord 0) was placed for 5 minutes to provide horizontal retraction and easy access to the preparation margins during the final scanning.
Tooth preparations for ceramic restorations and gingival-zenith correction on teeth 11, 13, 14, 21 were done in a single visit. The finishing line on the teeth was shaped according to the wax-up design. The soft tissues were stabilized with first-order provisional restorations while the final restorations were being fabricated.
A wax-up from printed models was duplicated with an A-silicone to create a silicone index for transferring to the maxillary and mandibular arches.
Using Ivoclar Telio CS C&B self-curing resin and the silicone index, we transferred the mock-up to the prepared maxillary and mandibular teeth with spot-etch and spot-bond techniques, thus fabricating chairside provisional restorations (first-order provisionals). After removal of the silicone index, the provisionals were refined with a 12D scalpel and a flame-shaped bur, each tooth was light-cured for 20 s to ensure reliable provisional retention.
Only at this stage we presented and obtained approval from the patient for the new tooth shape and length.


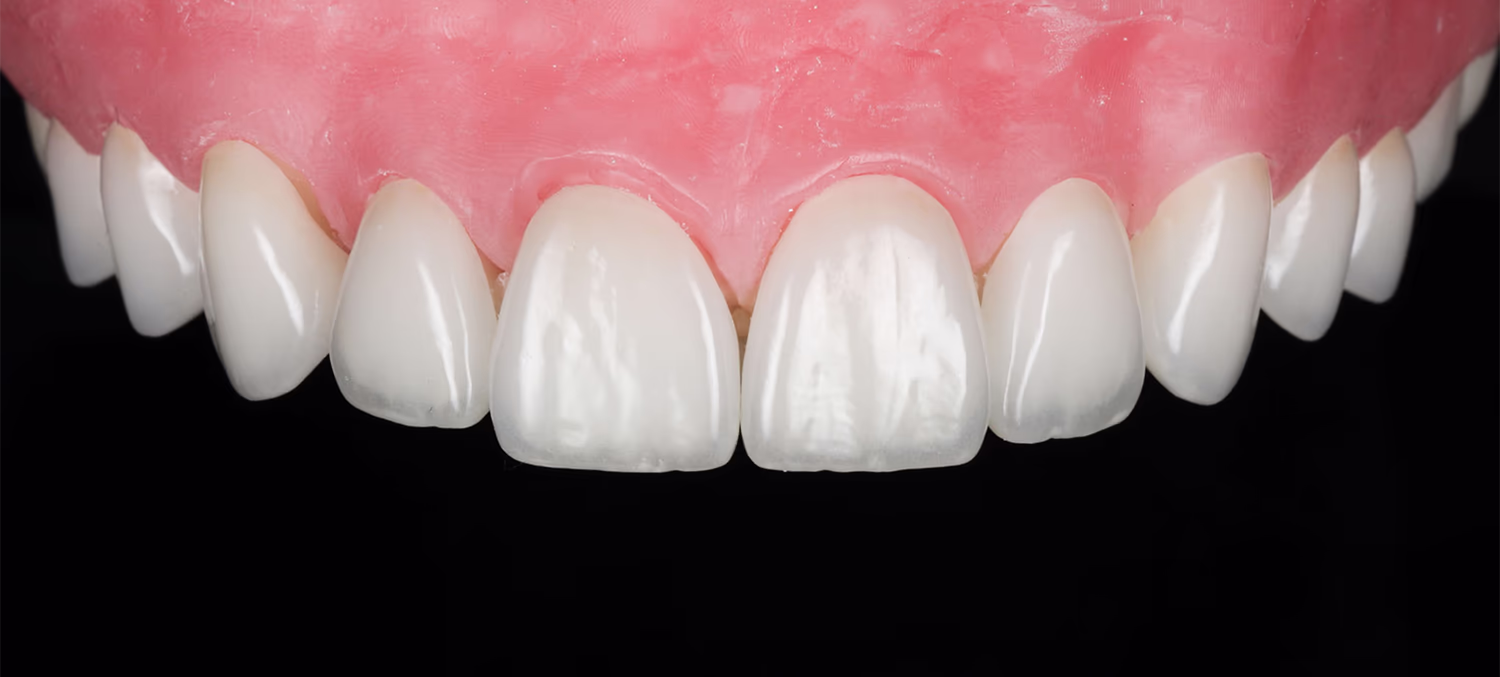
The patient’s next visit was scheduled for try-in and delivery of the ceramic veneers.
Provisional restorations were removed and the teeth were polished with Enhancefinishing cups to remove residual adhesive.
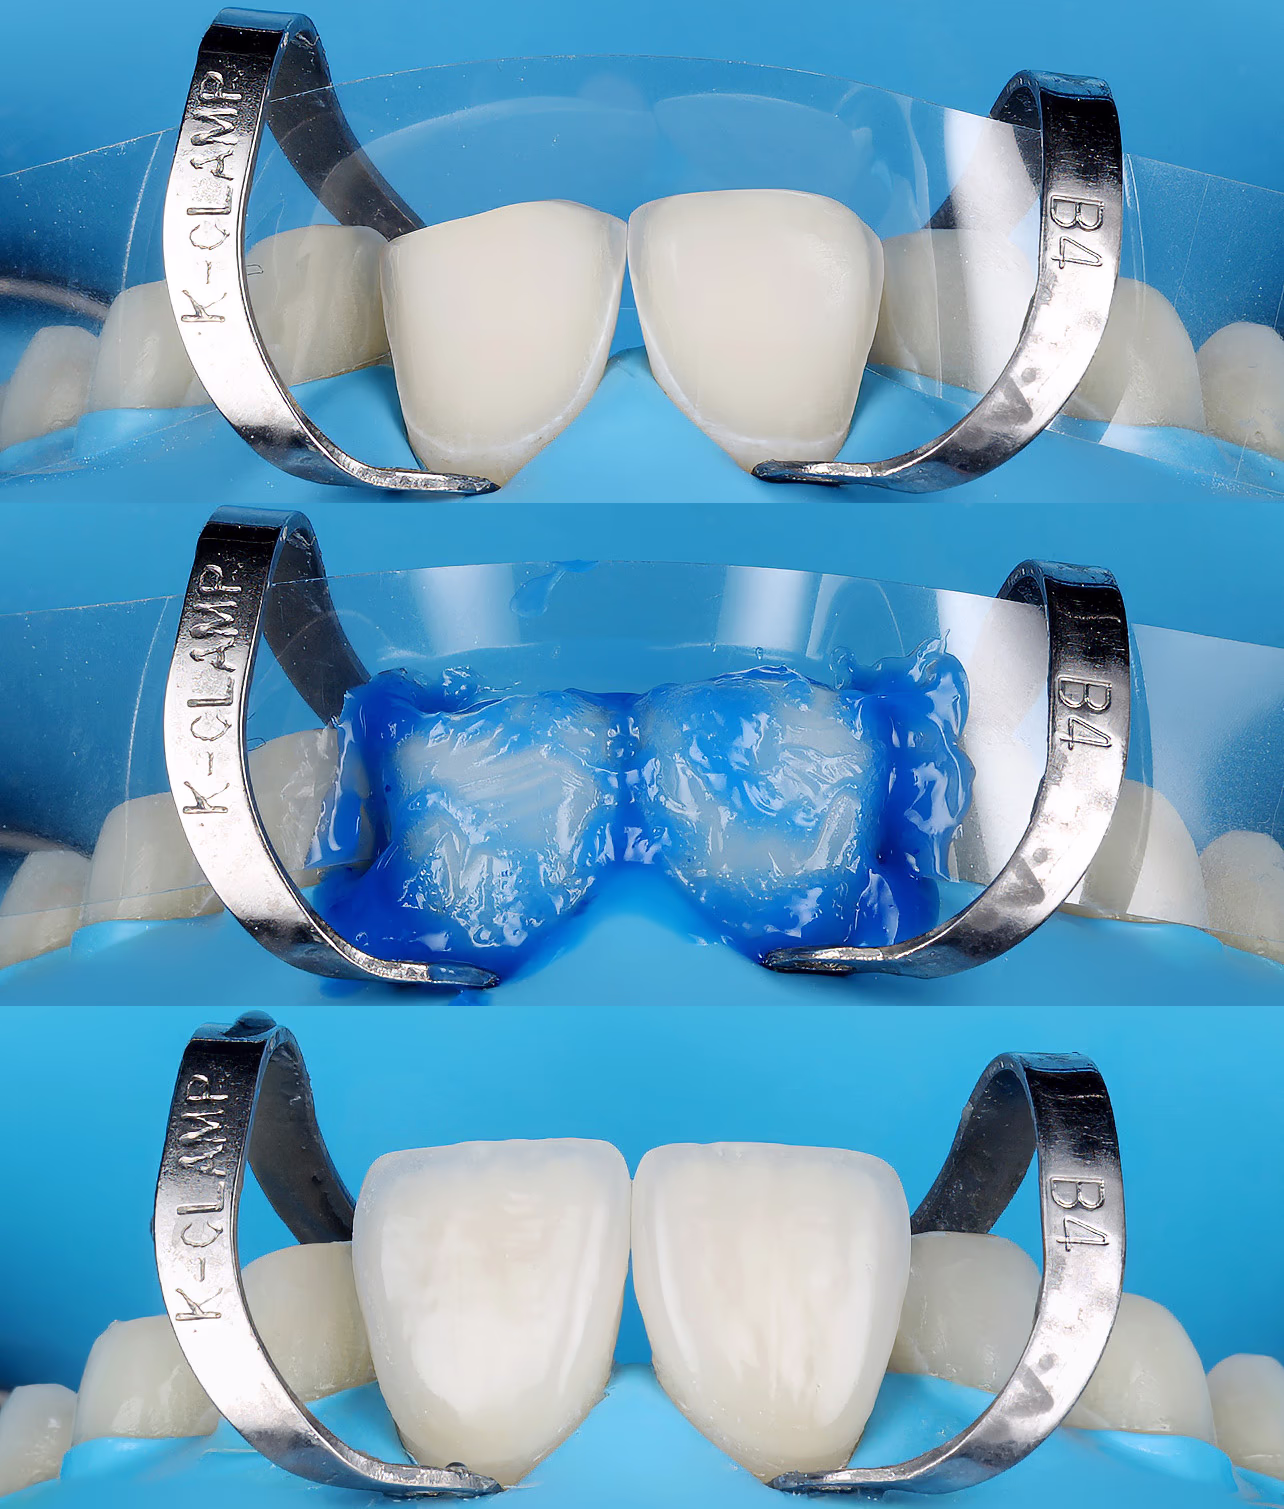
During the try-in, Ivoclar Try-In paste in Warm shade was used to simulate the final color of the resin cement.
After confirming marginal adaptation and esthetics, we proceeded to adhesive cementation.
Rubber dam isolation was used to ensure a dry field.
Internal cleaning of the ceramic restorations was performed with air abrasion using 27 µm aluminum-oxide powder (KaVo RONDOflex). This is an effective method of cleaning the intaglio surface after intraoral try-in.
Dynamic hydrofluoric acid etching (4.5%) was performed for 60 s on veneers placed on a refractory model.
To remove the HF residues, 96% ethyl alcohol was applied for 30 s.
The ceramic surface was silanized with Monobond Plus (Ivoclar) to promote chemical bonding between the ceramic and the resin cement.
Adhesive from the Clearfil SE Bond 2 (Kuraray) system was applied to the silanized ceramic for 20 s, and the excess was thinned with air. Variolink Esthetic LC (Ivoclar), shade Warm, was used as the resin cement.
To prevent premature polymerization of the resin cement, the conditioned veneers were stored in an orange light-protective box.
After isolating the teeth, the enamel surfaces were air-abraded with 27 µm Al₂O₃(KaVo RONDOflex) to clean and create micro-roughness for increased adhesive area.
For precise positioning, veneer cementation is always started with two central incisors.
To prevent the etchant and adhesive contact with the adjacent teeth, the centrals were isolated with Mylar matrix strips.
Dynamic enamel etching was performed for 30 s.
Adhesive procedures were carried out with Clearfil SE Bond 2 (Kuraray).
Each veneer received an initial tack-cure for 3 s, after which the excess resin cement was removed with a brush. The proximal excess was controlled with dental floss. Residual cement was carefully trimmed with a 12D scalpel.
During final light-curing, the soft-start mode for the curing light was selected. To avoid marginal discoloration at the tooth–ceramic interface, the oxygen-inhibited layer was eliminated using Air-Block glycerin gel.
The final composite margin polishing was performed with air-polishing Perio Kit and PROPHYflex Perio Powder (glycine; KaVo).
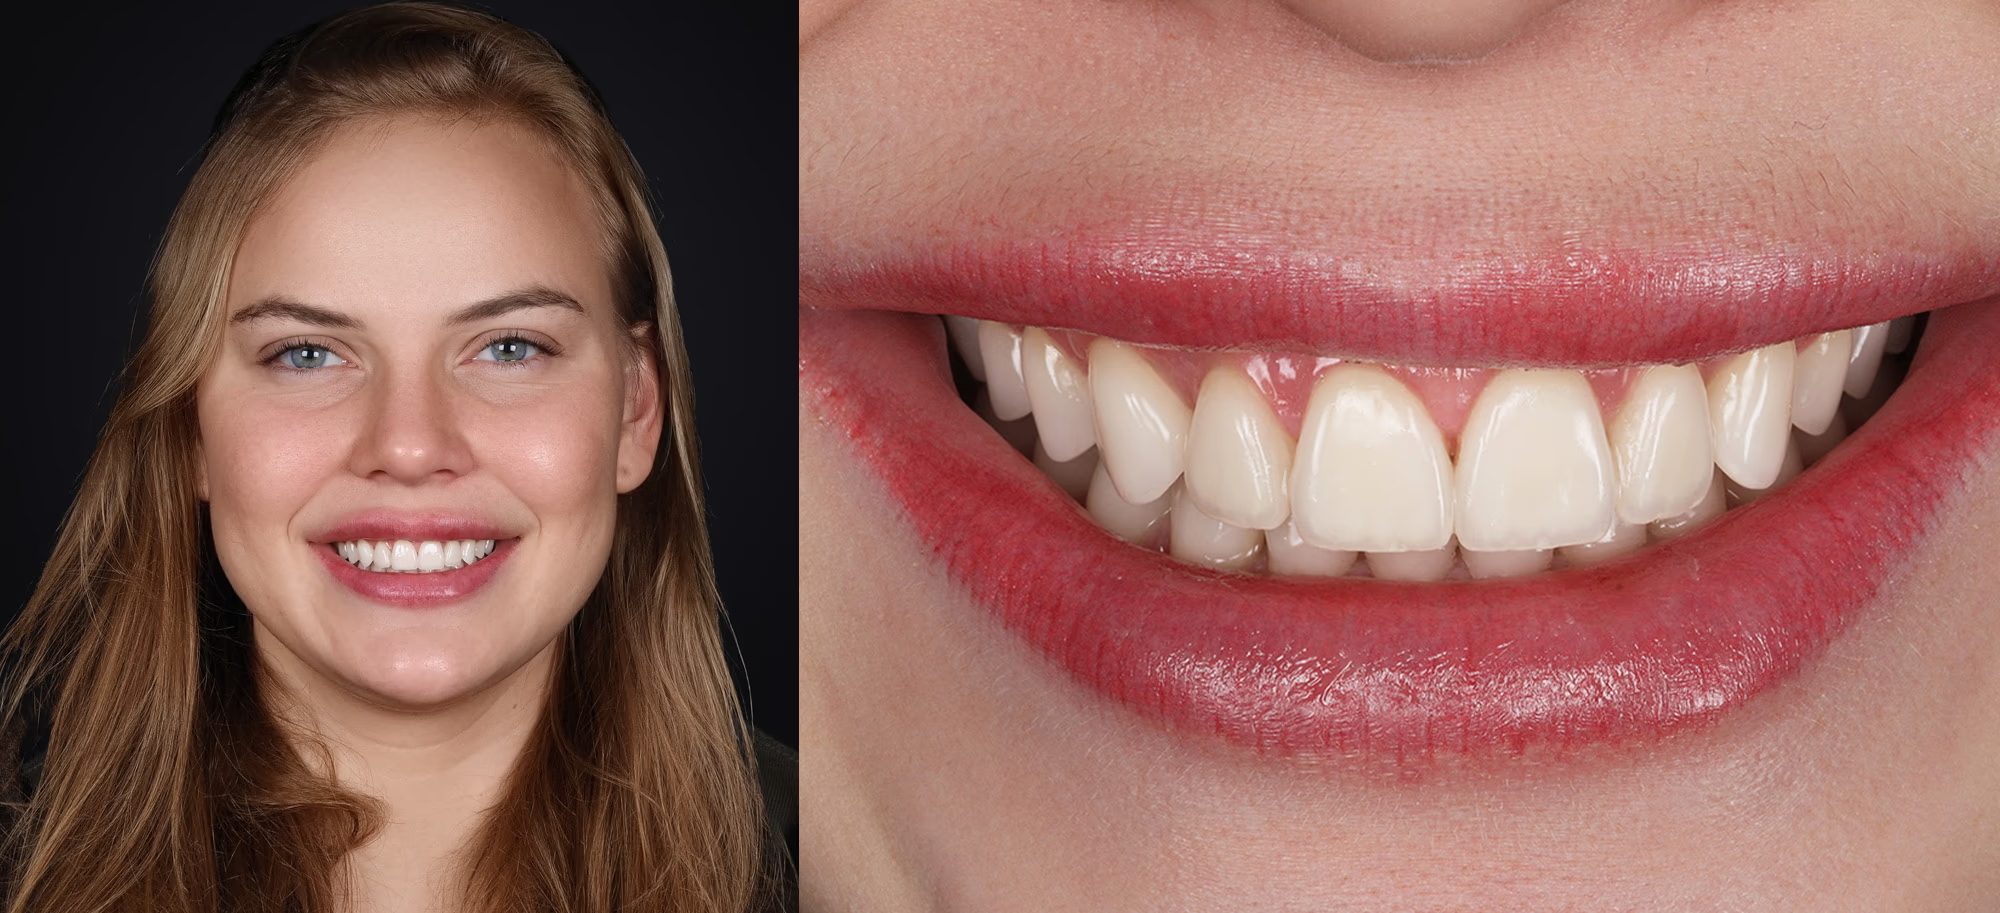


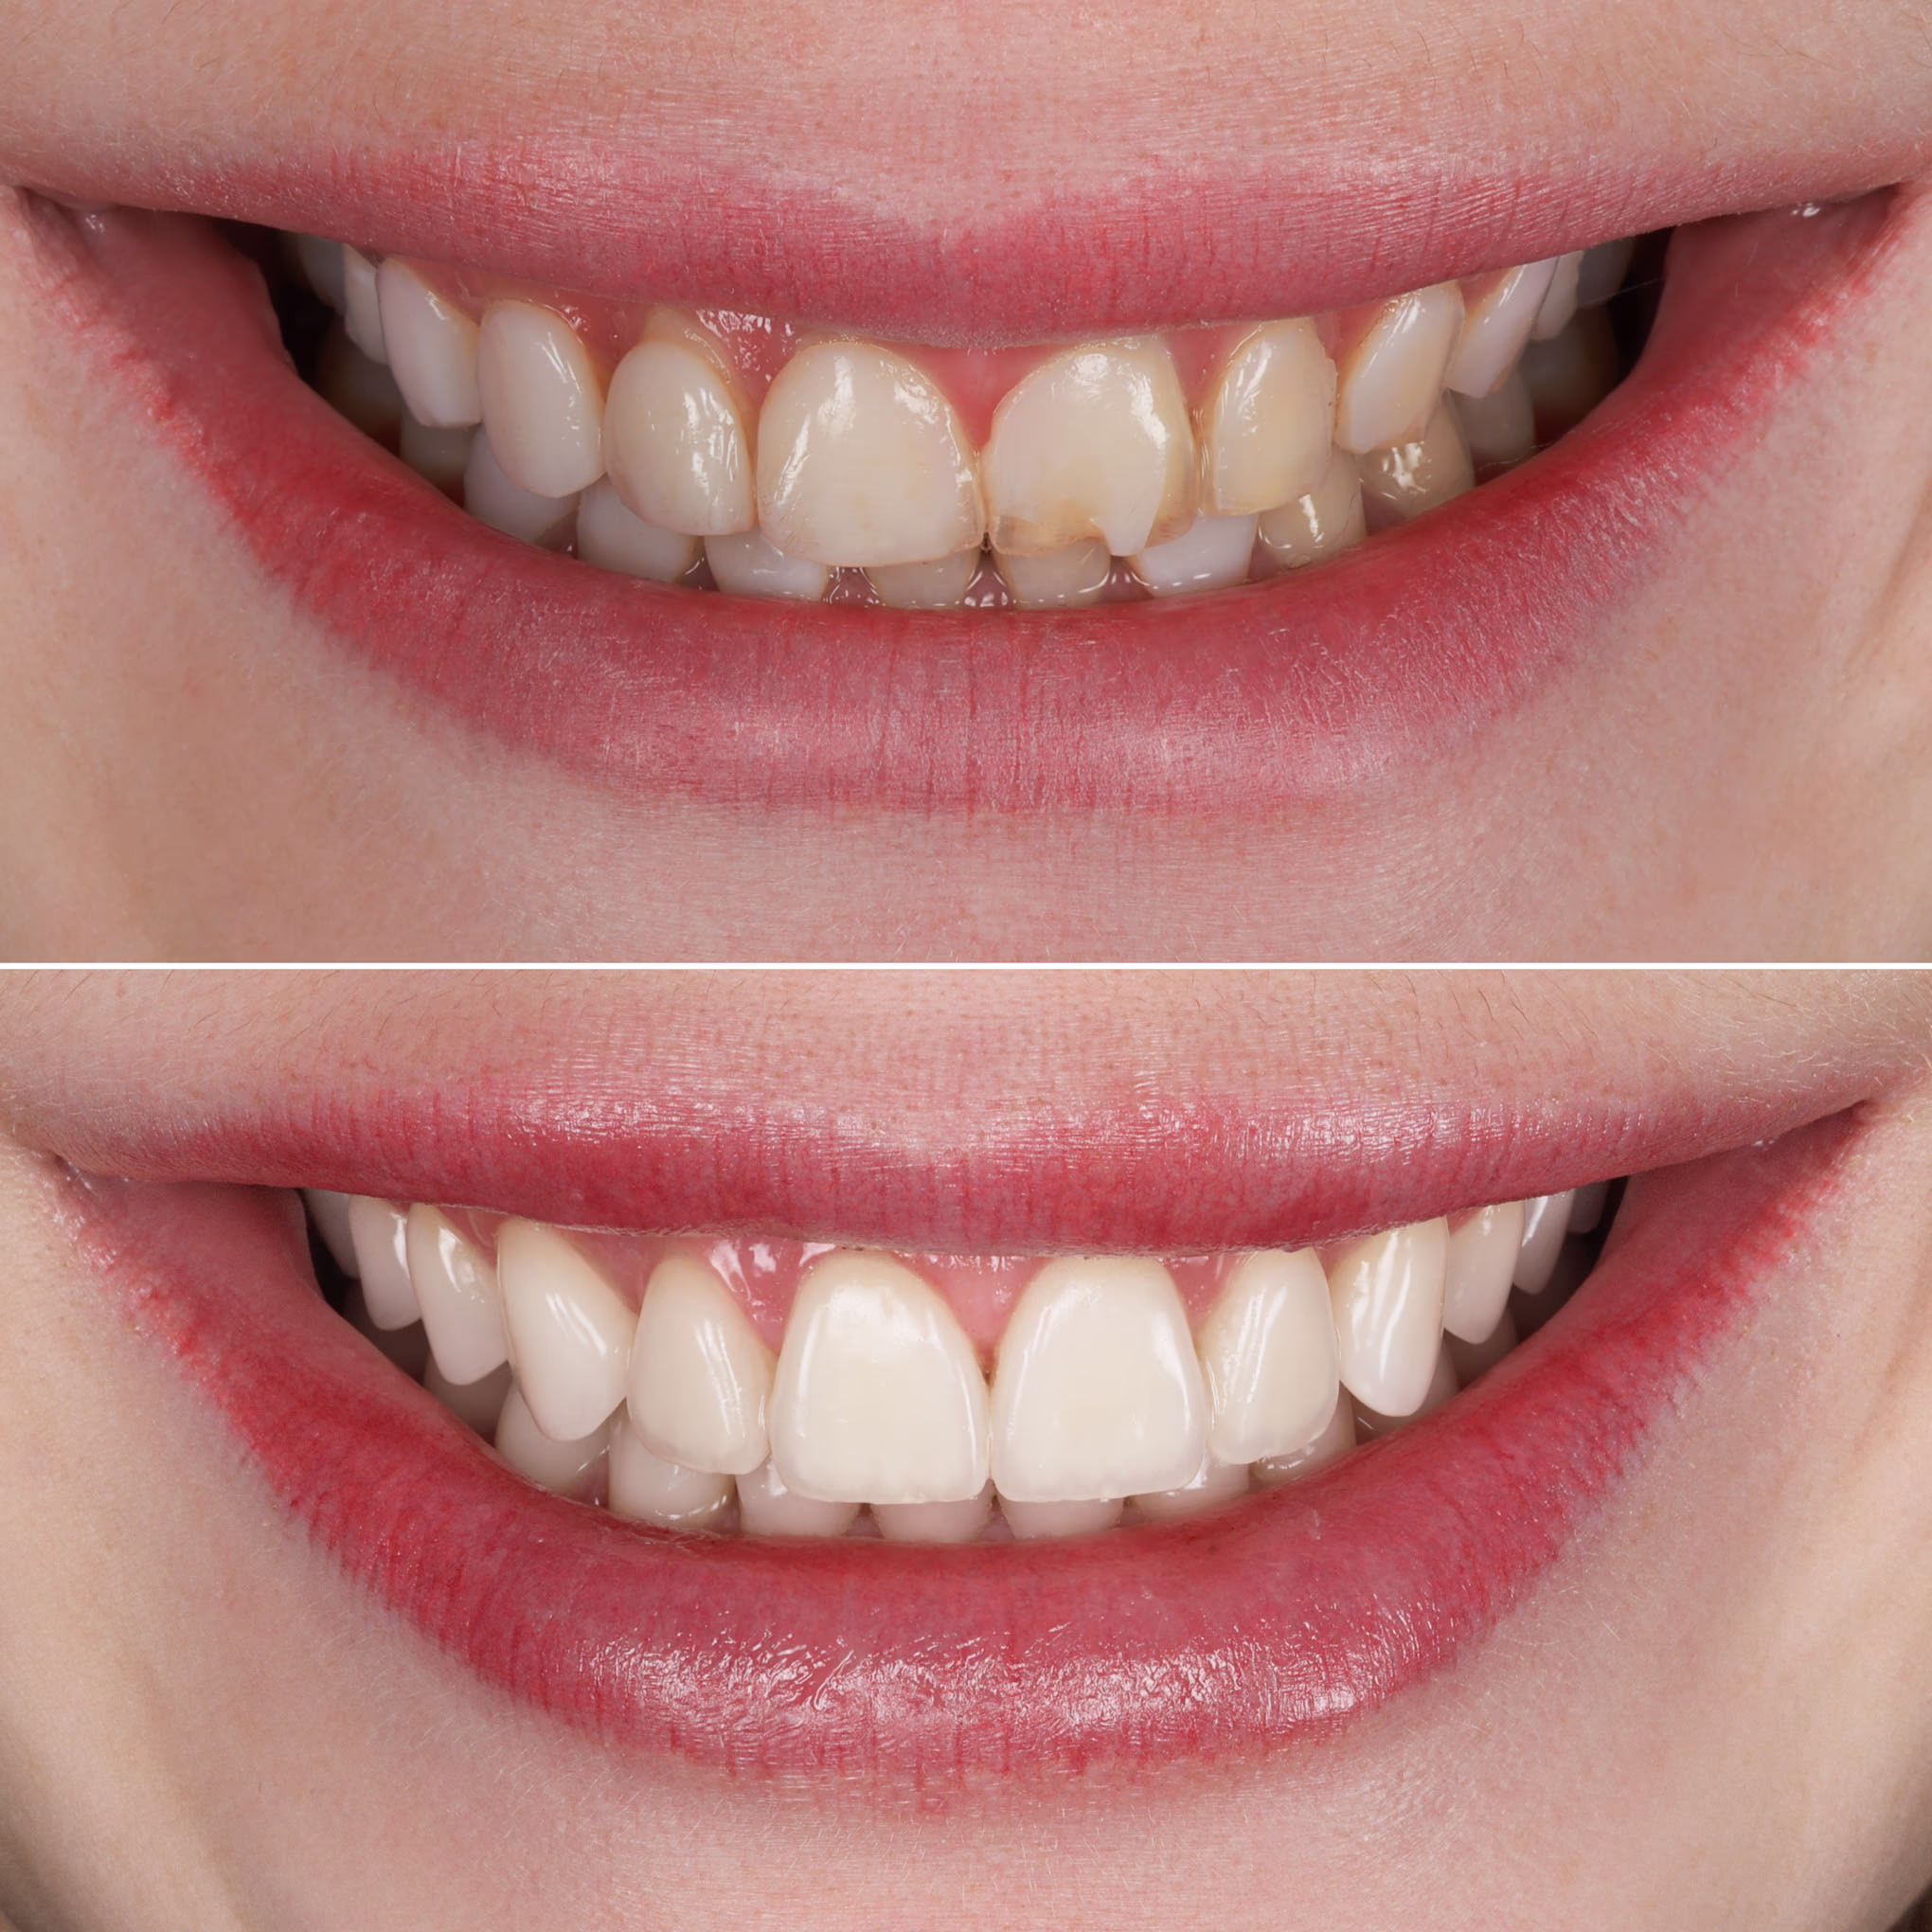
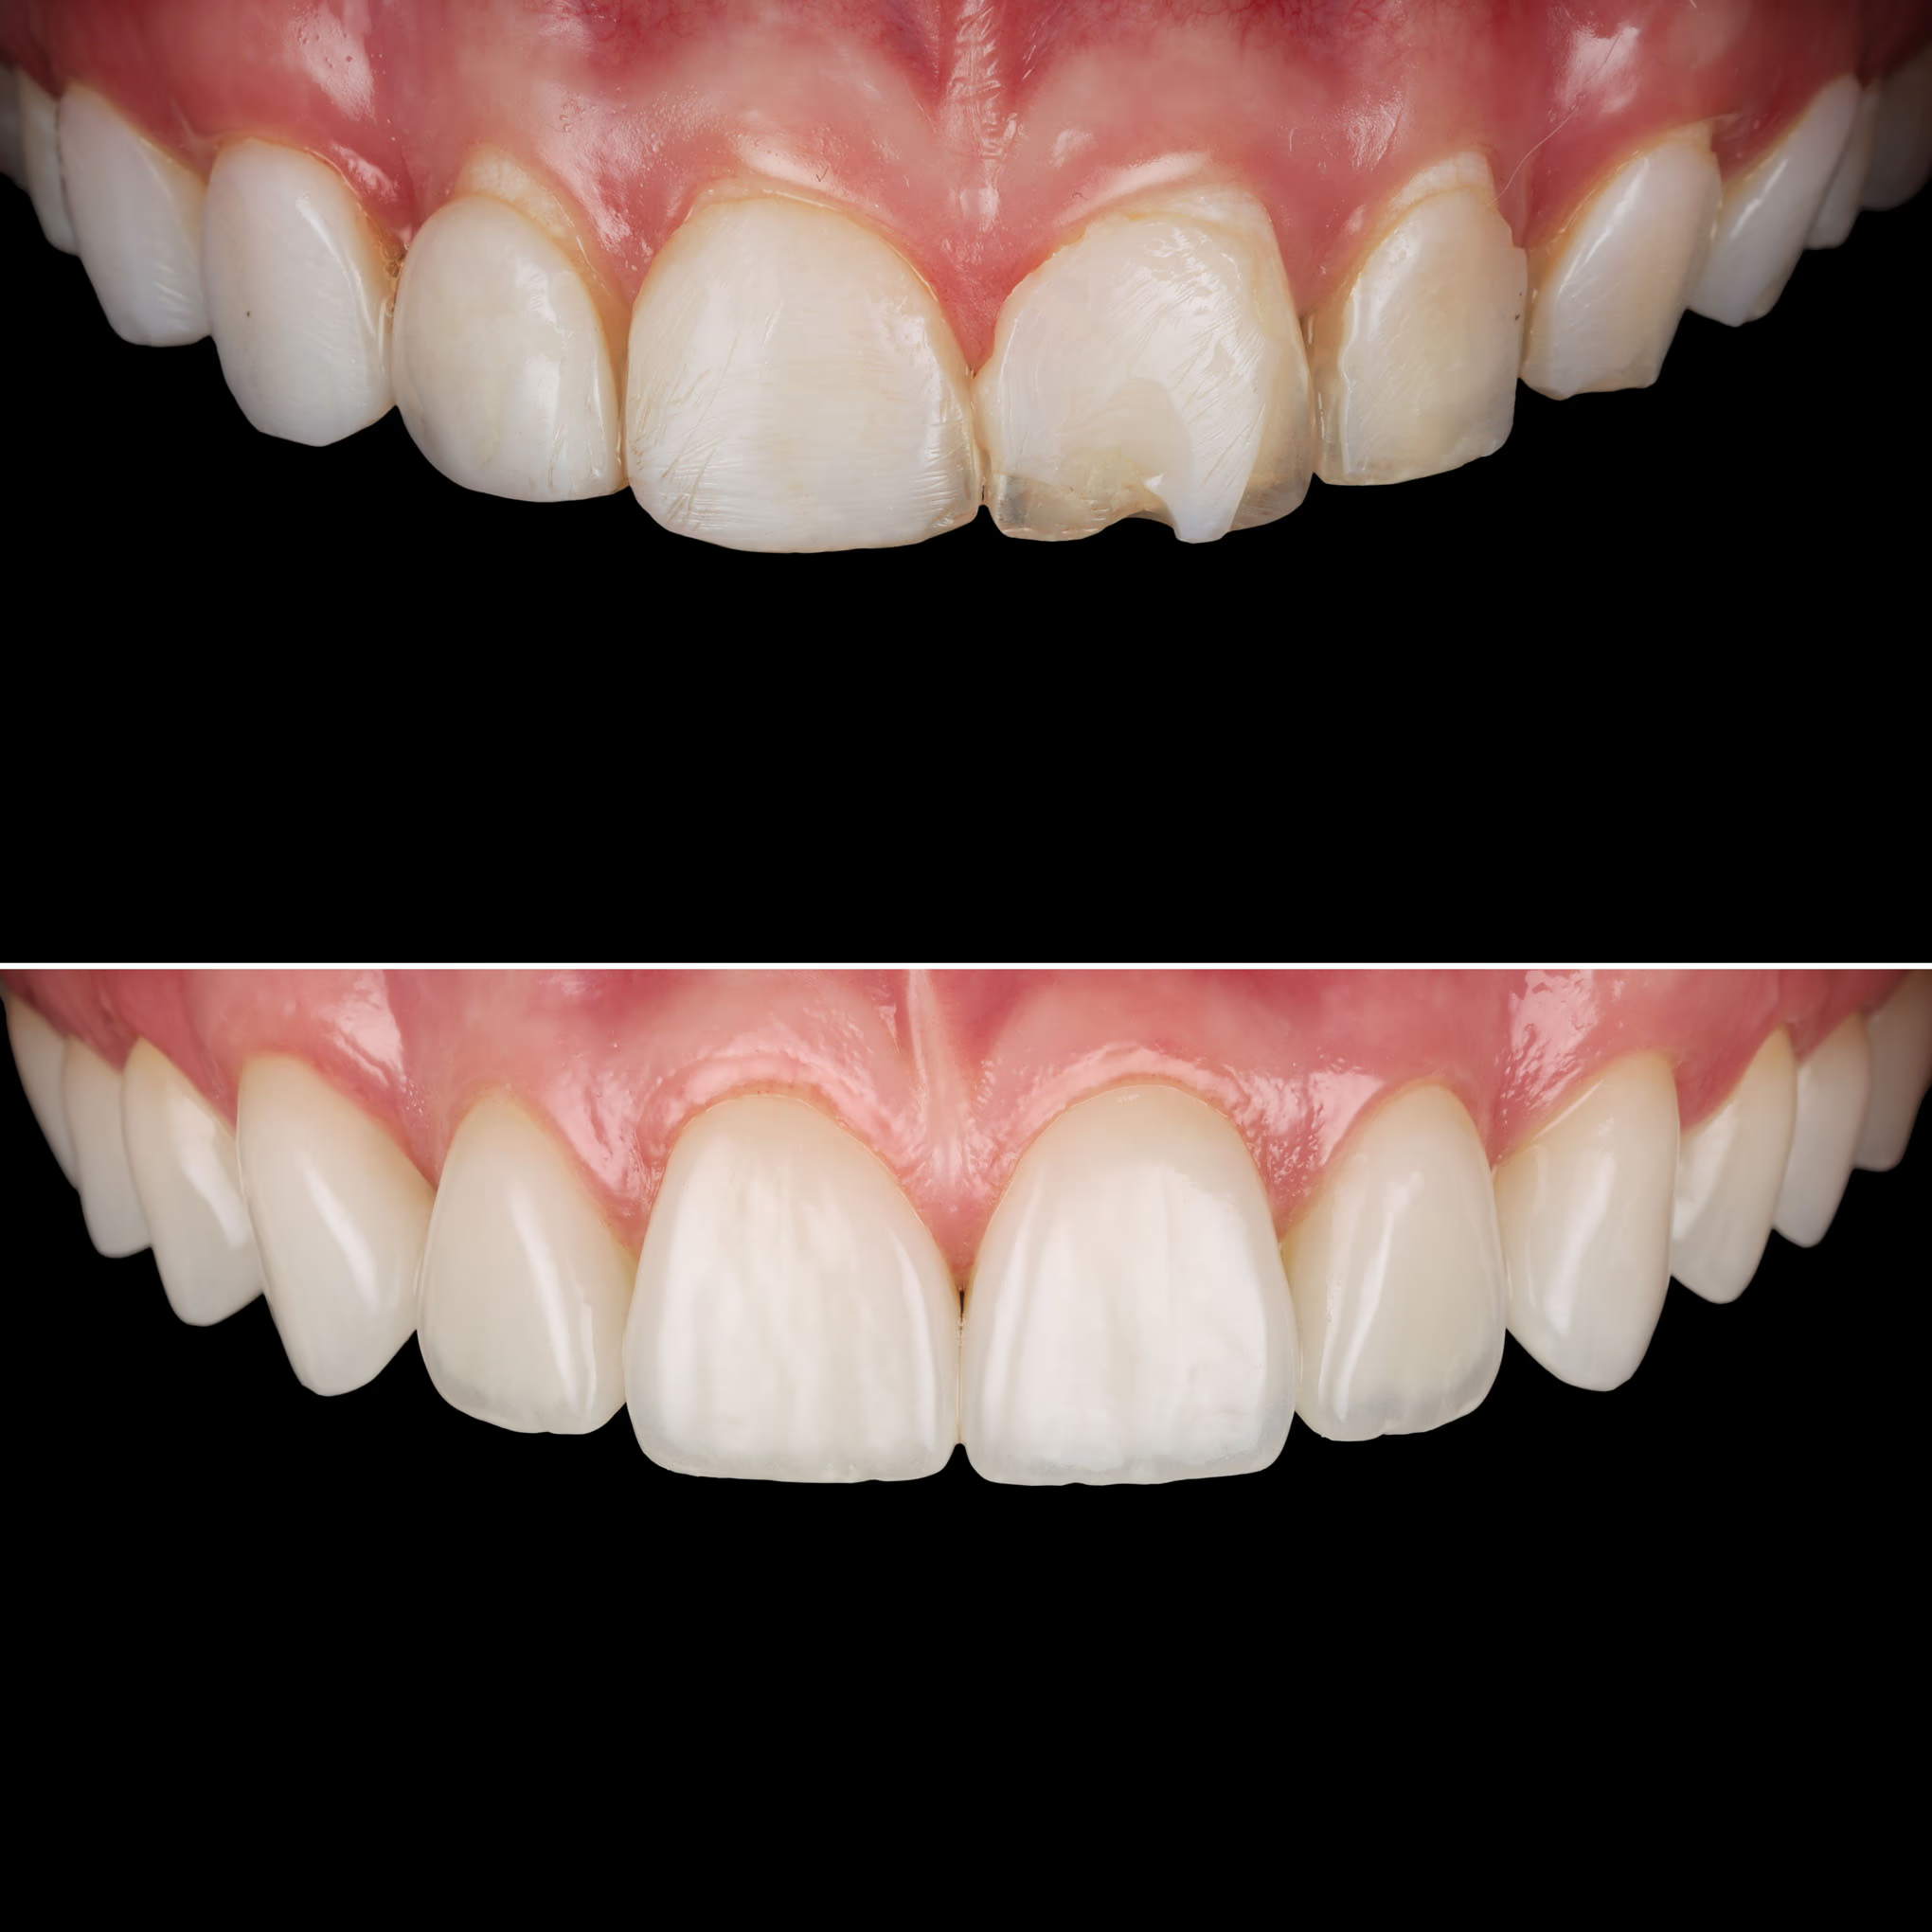

We succeeded in combining composite and ceramic restorations within a single functional-esthetic rehabilitation, thereby maximizing preservation of the natural dental tissues.